Creating and Managing Connection(s)
This guide shows how to connect your warehouse to Numbers Station from within the web application and start to ask analytics questions.
Setting Up Permissions in Data Warehouse
In order to connect to your data warehouse, you will first need to set up a way to share access with Numbers Station in a controlled way. This varies by data warehouse, so please check the instructions for your specific use case.
Databricks
To connect to Databricks, Numbers Station requires that you:
- Provide warehouse parameters
- Create a service principal
- Create a Personal Access Token (PAT) for the service principal
Provide Warehouse Parameters
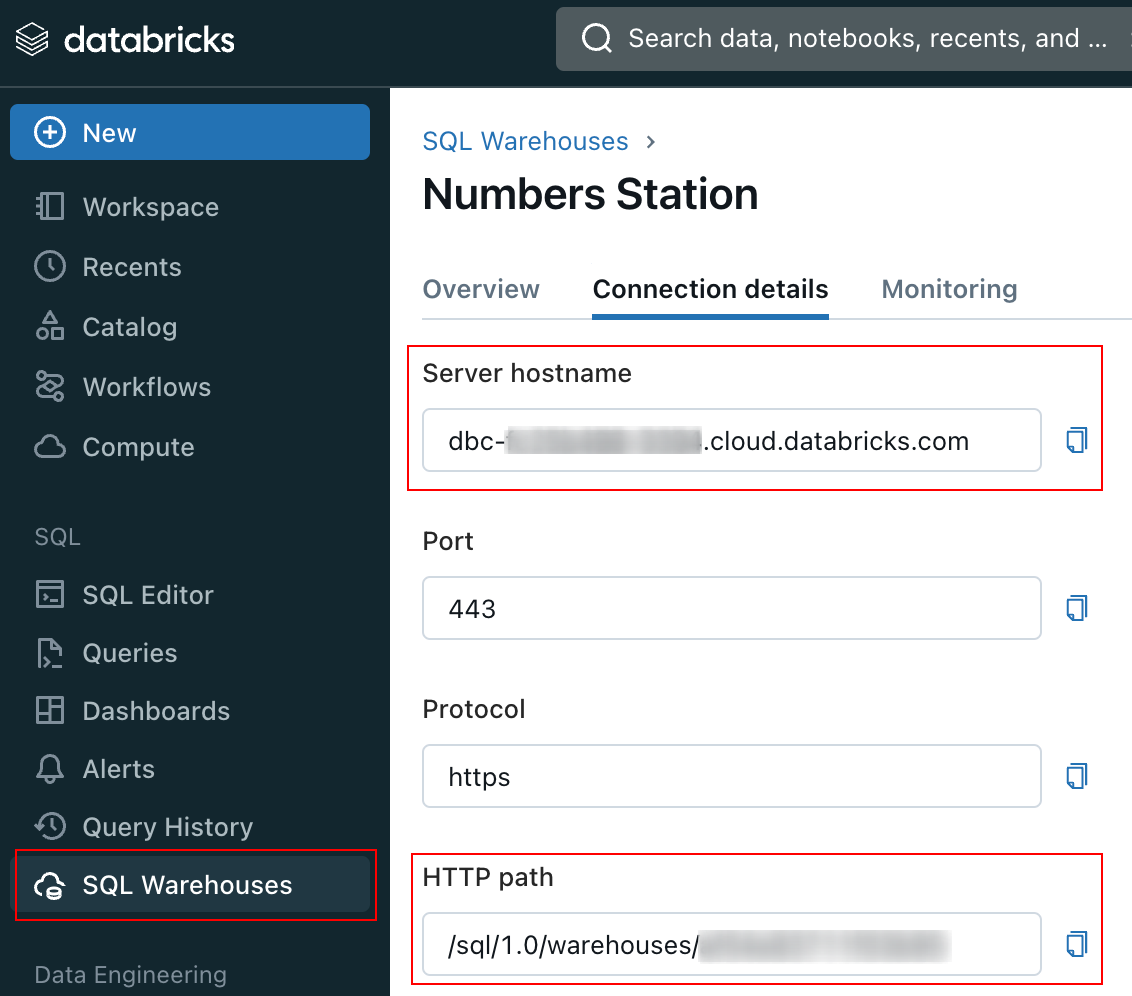
In your databricks workspace, go to SQL > SQL warehouses and select your warehouse.
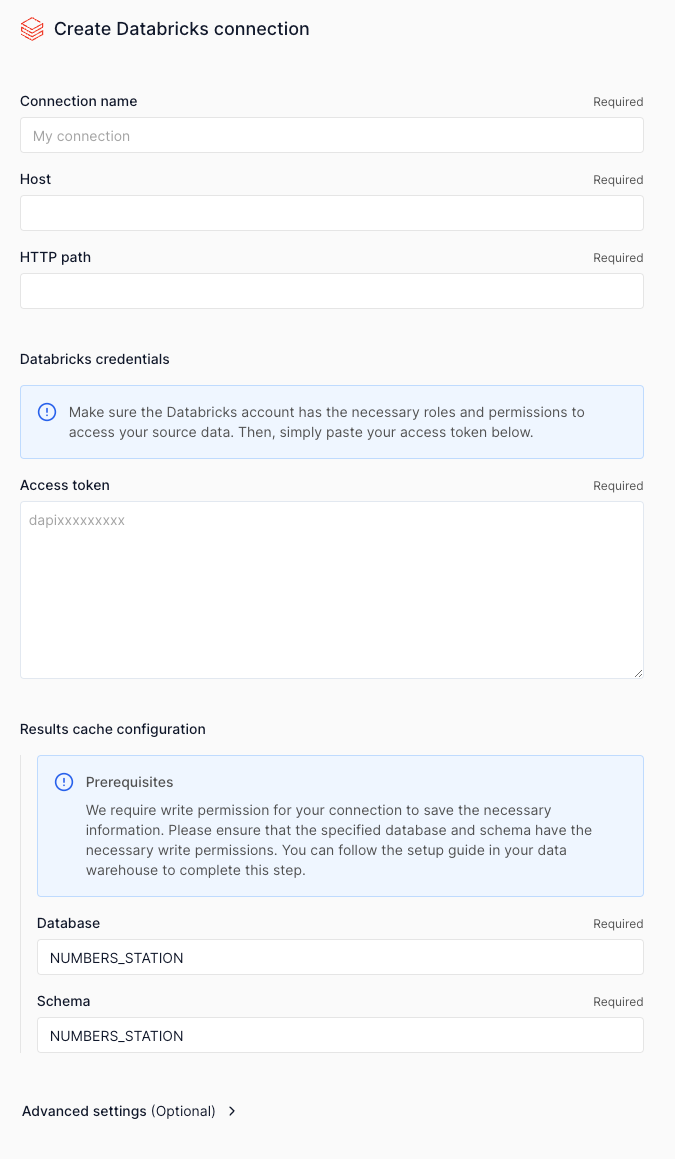
Then, go to the Connection details tab and copy the Server hostname and HTTP path to the fields on the left.
Create a Service Principal
It is best practice to follow the principle of least privilege. You can do so by creating a service principal for use by Numbers Station and only allowing access to the resources you plan to connect with Numbers Station.
Follow the databricks guide to create a service principal.
Once your service principal is created, you'll need to enable access token usage for this service principal.
Grant Permissions
In order to function, Numbers Station requires you to provide the service principal the correct entitlements and permissions.
Entitlements
Numbers Station needs databricks-sql-access entitlements.
This is provided by default, but you can follow these Databricks instructions to ensure the correct entitlement is provided.
"Data Editor" Permissions
Numbers Station requires "Data Editor" permissions on the result cache schema.
Assuming you have already added your service principal to the workspace, locate your result cache schema in your Catalog.
Then, select the Permissions tab, select the service principal in the Principals drop down menu, and select the Data Editor Privilege preset.
Finally, we need the MANAGE permission checked so that we have permissions to drop tables from the Numbers Station scratchspace.
Then, click Grant.
Create a PAT
Follow this databricks guide to create a PAT for your service principal.
Save the access token, you'll need it to create the connection in Numbers Station.
Snowflake
Snowflake recommends granting permissions to a role other than ACCOUNTADMIN.
See Snowflake for more on the use of the ACCOUNTADMIN Role.
Create a Custom Role
Create a Numbers Station specific role in Snowflake to interface with Numbers Station. In Snowflake, run the following to create a custom role and user with access to the databases, schemas, and tables you want to interact with in Numbers Station.
Warning
If you choose to rely on an existing user, ensure the user has DEFAULT_ROLE as NUMBERSSTATION or wider, a DEFAULT_WAREHOUSE, and that the DEFAULT_ROLE has access to the DEFAULT_WAREHOUSE.
For example, if your DEFAULT_ROLE is ORGADMIN, you generally won't have been granted usage on any warehouses.
Google BigQuery
To connect to BigQuery, Numbers Station requires that you:
- Create a custom role.
- Create a service account to connect to Google Cloud Platform (GCP).
- Ensure your GCP project has the correct APIs enabled.
Creating a Custom Role for Numbers Station
It is best practice to follow the principle of least privilege. You can do so by creating a custom role for use by Numbers Station with at least the following permissions.
  - bigquery.datasets.create
  - bigquery.datasets.delete
  - bigquery.datasets.get
  - bigquery.jobs.create
  - bigquery.tables.create
  - bigquery.tables.delete
  - bigquery.tables.get
  - bigquery.tables.getData
  - bigquery.tables.list
  - bigquery.tables.update
  - bigquery.tables.updateData
Permissions in YAML
Here is an example command to create the role programmatically (it requires gcloud and jq installed).
Creating a Service Account
Once you have the custom role, you can proceed to create a service account. Numbers Station uses this account to access your data, as well as set up the cloud functions and remote functions needed to run our transformations. Make sure to assign the custom role during the second step of the creation process.
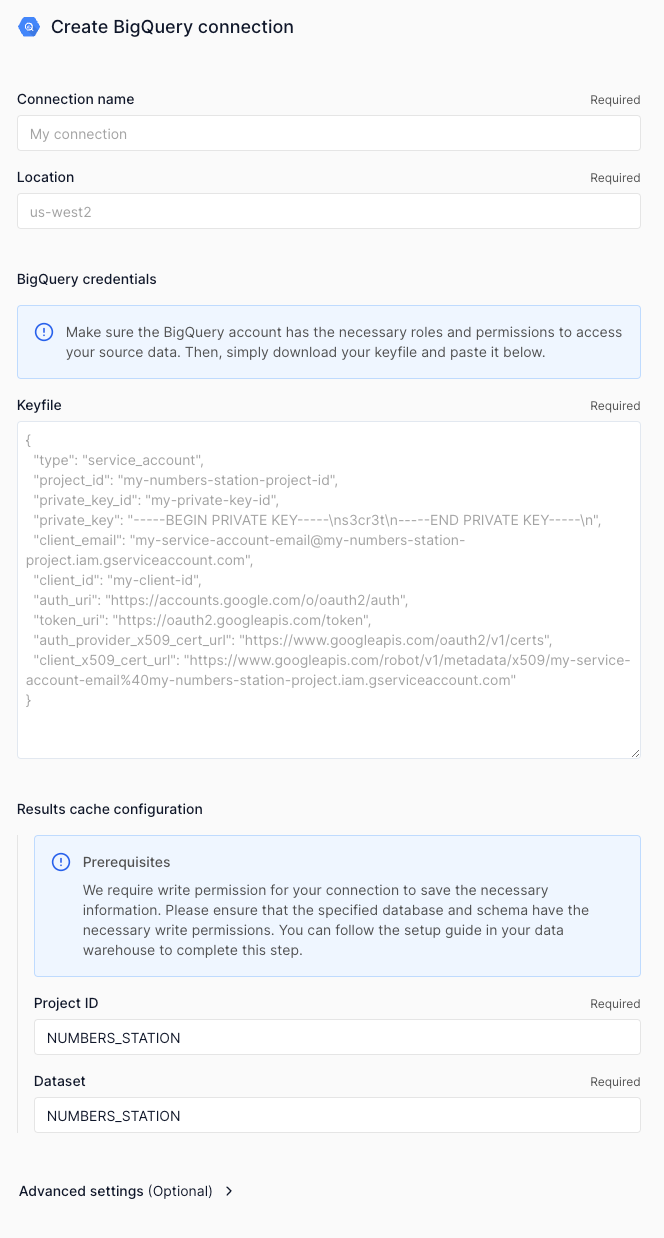
After creating the service account, you must then generate a JSON service account key. You will provide it to Numbers Station to grant us access to the project that this service account is associated with. The file's contents are stored and encrypted in transit and at rest.
Enabling APIs
To validate permissions, your project must have the Cloud Resource Manager API enabled.
To connect to external tables, your project must have BigQuery Connection API enabled.
For each external table, permissions also must be added. For example, if the external table comes from Google Sheets, the service account email needs be on the share list of the Sheet.
Warning
BigQuery does not support cross-location queries.
So, when you specify a connection's location, select the location that matches the location of the datasets you are operating on.
Otherwise, Numbers Station's connection will be unable to query your data.
For instance, if the dataset is in the us-west2 region, the connection must use the same region and the multi-region US does not work.
If the dataset is in the US region, the connection must use the multi-region US, not a single region us-west1.
Tableau
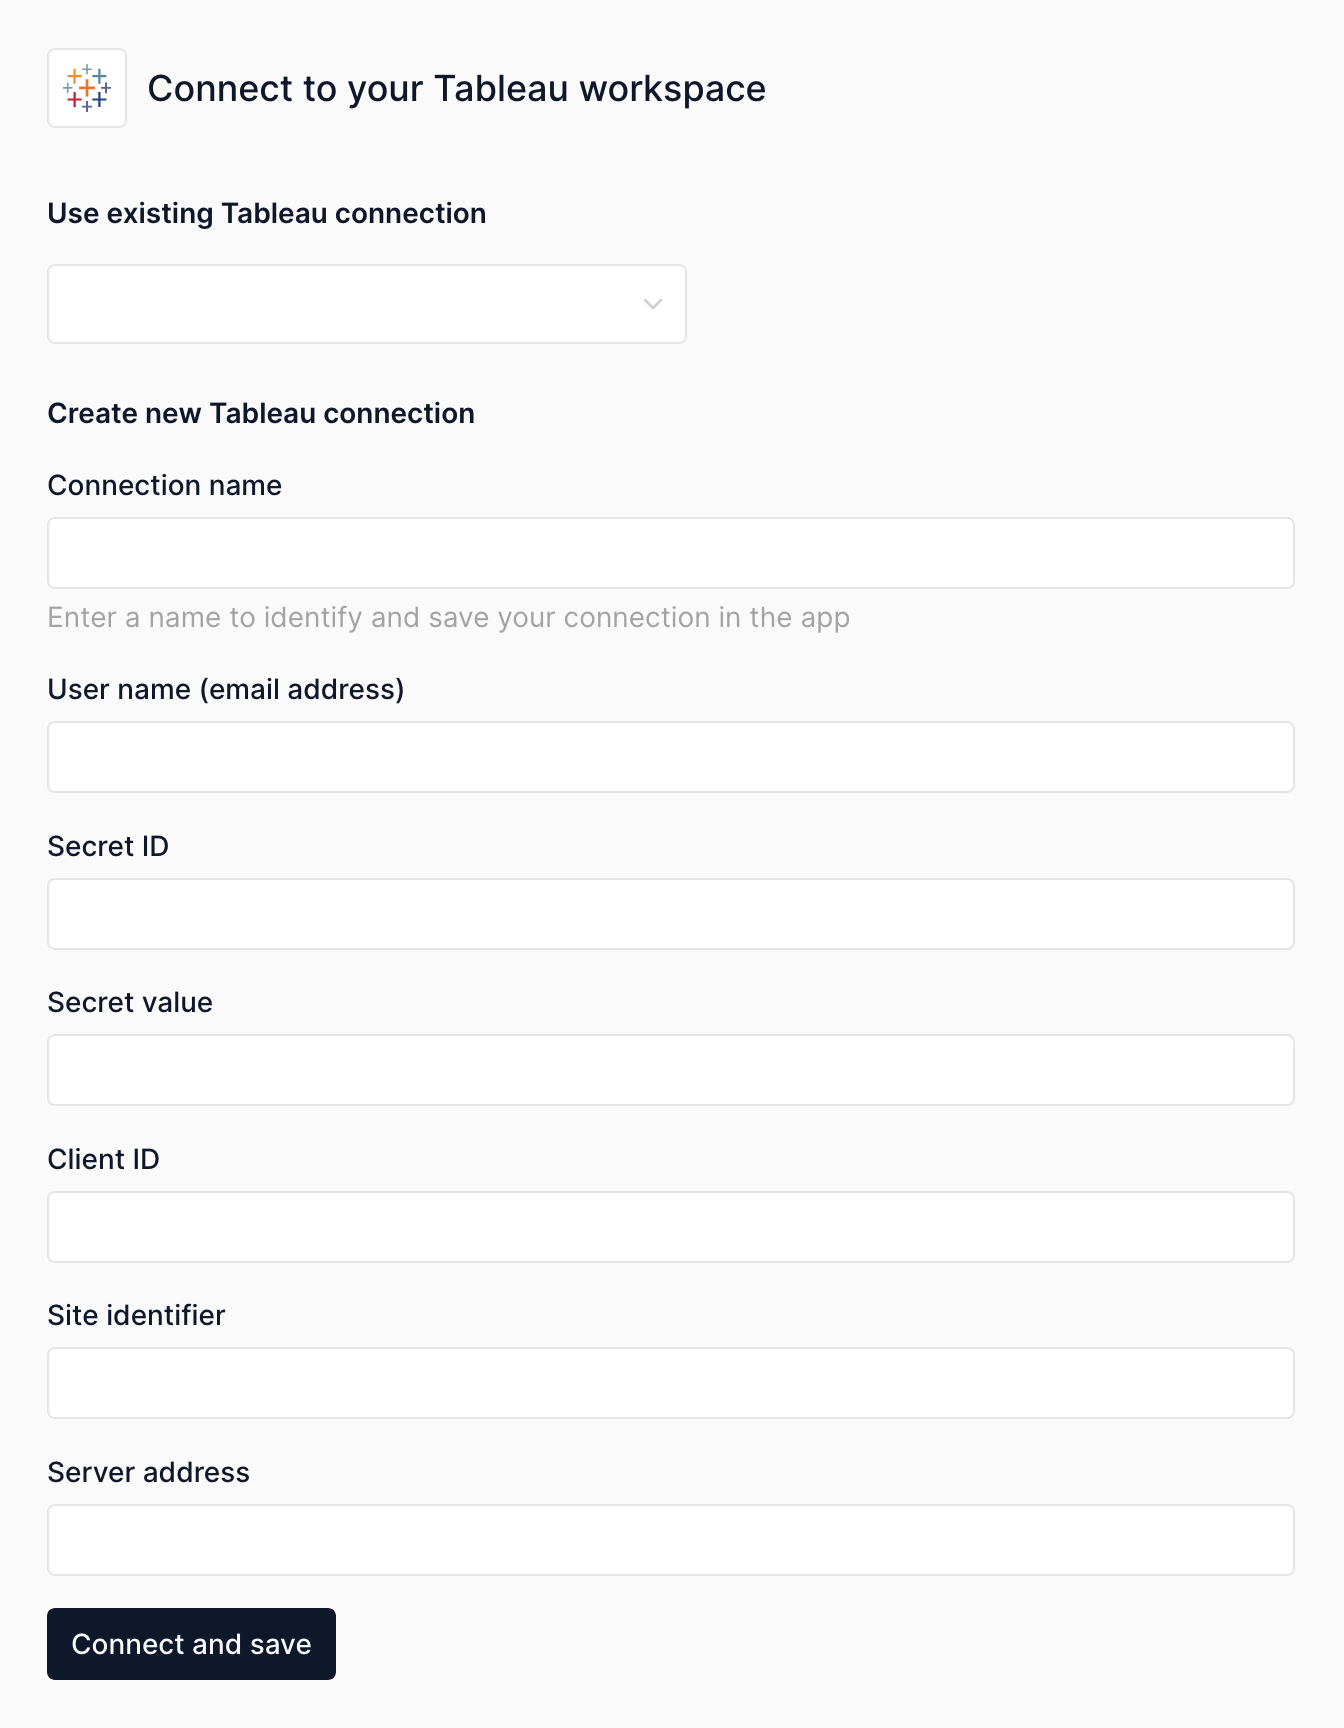
Tableau is a data visualization tool widely used for business intelligence and analytics. It allows users to connect to a variety of data sources, transform data, and create interactive, shareable dashboards and visualizations. This helps users analyze and gain insights from their data more effectively.
Numbers Station supports direct integration with your tableau workbooks.
Configuration
To connect to Tableau, Numbers Station requires that you:
- Provide service address and site ID.
- Configure Connected Apps with Direct Trust.
Provide service address and site ID
Service Address
The service address is essentially the URL of your Tableau Server or Tableau Online instance.
- If you're using Tableau Online: The service address will typically be in the format https://[your-site].online.tableau.com, where [your-site] is your site's specific name.
- If you're using Tableau Server: The service address is the base URL where your Tableau Server is hosted, often something like https://yourserver.com or https://[IP address]:[port] if accessed by IP.
Site ID
Go to your Tableau Server or Tableau Online and log in. In the URL, after the base service address, you will see the Site ID. For example, in https://yourserver.com/#/site/[site-id]/workbooks, the [site-id] segment is your Site ID. If you're on the default site, the Site ID may be "Default," or it could be another custom name if you've set up multiple sites.
Configure Connected Apps with Direct Trust.
Tableau suggests to use Tableau Connected Apps for application integration. Tableau connected apps enable a seamless and secure authentication experience by facilitating an explicit trust relationship between your Tableau Cloud site and external applications.
You can do so by creating a connected app for use by Numbers Station and only allowing access to the resources you plan to connect with Numbers Station.
Follow the Configure Connected Apps with Direct Trust to create a connected app.
Enable the connected app and generate the secret value.
SQL Server
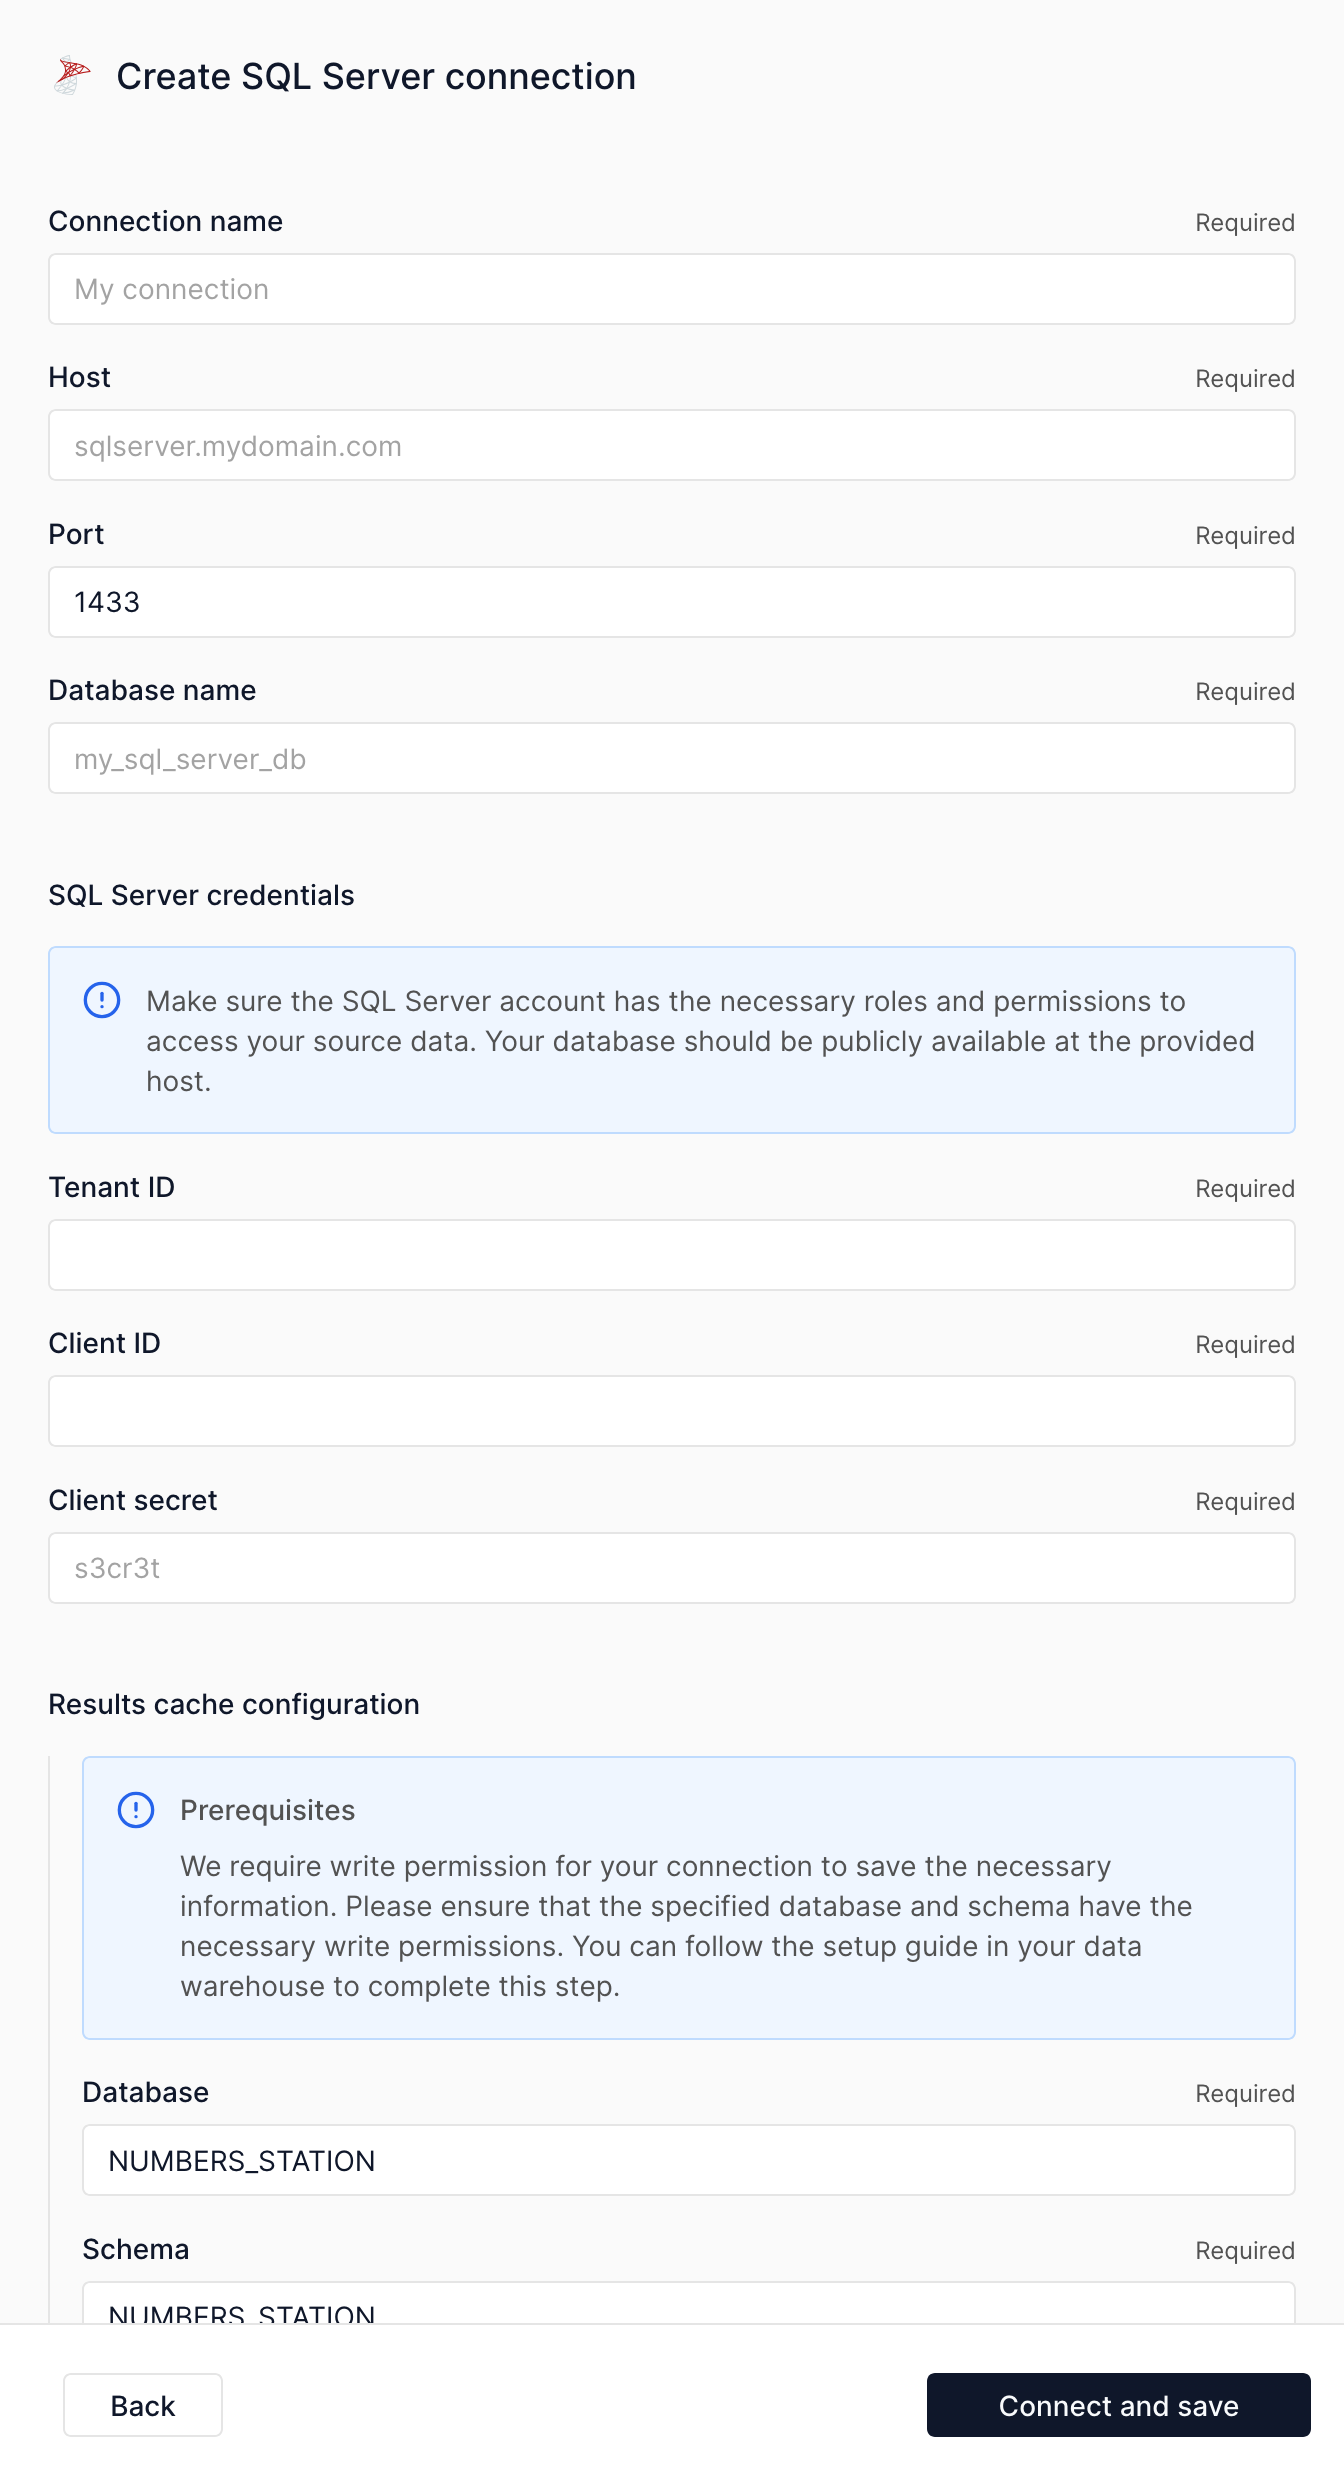
SQL Server is Microsoft's relational database management system that provides secure, scalable data storage and analytics capabilities. Numbers Station supports direct integration with your SQL Server databases through Azure Active Directory authentication.
Creating a Service Principal for Numbers Station
To connect to SQL Server, Numbers Station requires that you:
- Create an Azure AD service principal
- Grant the service principal access to your SQL Server
- Create database users and assign appropriate permissions
Create an Azure AD Service Principal
Install and set up the Azure CLI if you haven't already, then create a new application service principal:
You should see output similar to this:
{
  "appId": "XXXXXXXX-XXXX-XXXX-XXXX-XXXXXXXXXXXX",
  "displayName": "numbers-station-demo",
  "password": "XXXXXXXXXXXXXXXXXXXXXXXXXXXXXXXXXXXXXXXX",
  "tenant": "XXXXXXXX-XXXX-XXXX-XXXX-XXXXXXXXXXXX"
}
Save this information as you will need it later when creating the connection in Numbers Station.
Grant SQL Server Access
Give your service principal access to your Azure SQL server at the resource group level:
az role assignment create \
    --assignee <appID>  \
    --scope /subscriptions/XXXXXXXX-XXXX-XXXX-XXXX-XXXXXXXXXXXX/resourceGroups/ns_demo_rg \
    --role "SQL Server Contributor"
Create Database Users and Assign Permissions
Connect to your source database and create a user for the service principal:
-- Source Database
CREATE USER [numbers-station-demo] FROM external provider;
GRANT SELECT TO [numbers-station-demo];
Then create a schema for Numbers Station to cache results in, either in the same database or a different one:
-- Result Cache Database
CREATE SCHEMA [NUMBERS_STATION];
GRANT ALTER ON SCHEMA::[NUMBERS_STATION] TO [numbers-station-demo];
GRANT SELECT ON SCHEMA::[NUMBERS_STATION] TO [numbers-station-demo];
GRANT INSERT ON SCHEMA::[NUMBERS_STATION] TO [numbers-station-demo];
GRANT CREATE TABLE TO [numbers-station-demo];
Redshift
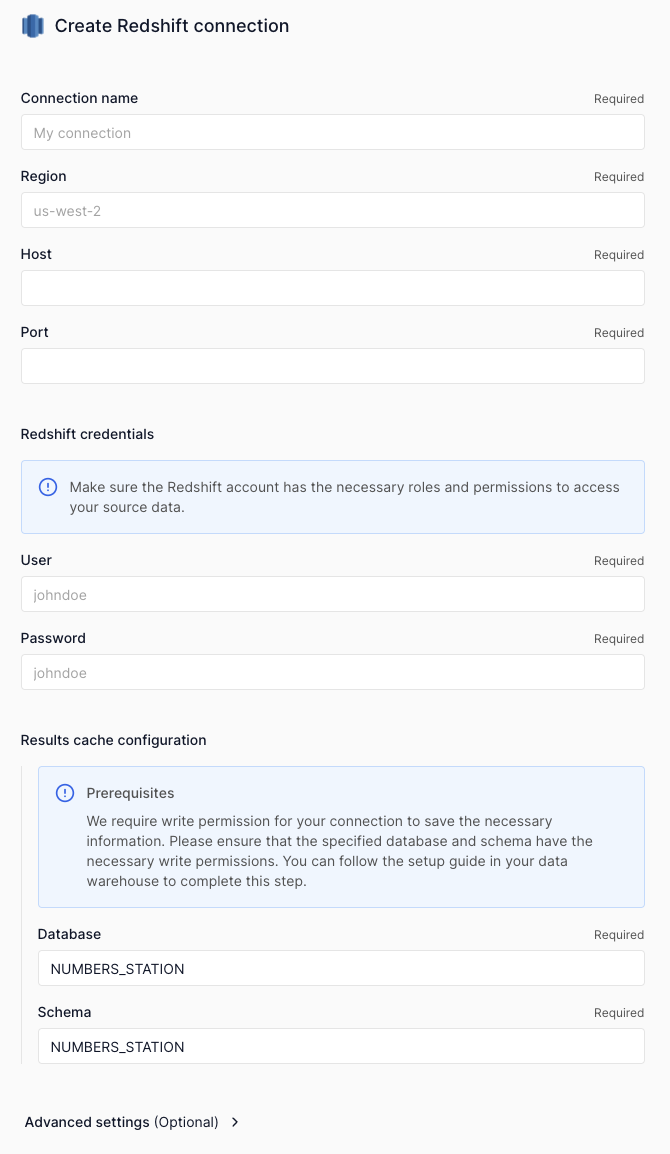
Amazon Redshift is a fully managed, cloud-based data warehouse service that allows organizations to run fast, complex queries on large datasets. It is designed for scalability and performance, enabling users to easily store and analyze vast amounts of data for business intelligence and analytics.
Numbers Station supports direct integration with your Redshift data.
Creating a Dedicated User for Numbers Station
To connect to Redshift, Numbers Station recommends creating a dedicated user with minimal permissions.
Specifically, we need:
CREATEpermission on the database.SELECTpermission on all tables within thepublicschema- To share tables beyond those in the public schema with Numbers Station, we need both
SELECTon the tables themselves andUSAGEon their corresponding schemas. ALLpermissions on a schema for Numbers Station's internal results cache (or allow Numbers Station to create its own schema).
The following instructions show how to do so using your superuser Redshift account.
Prerequisites:
- Access to a Redshift superuser in order to grant permissions.
- We currently require the
enable_case_sensitive_identifierconfiguration to befalse(the default value) on your cluster. You can verify the value of this setting by runningSHOW enable_case_sensitive_identifier;.
To connect to Redshift, Numbers Station recommends that you:
- Create a new user by running
CREATE USER<user_name> PASSWORD <password>;. Numbers Station will use this user to access tables within your database. - Provide
CREATEpermission on the database you are sharing with us by running:GRANT CREATEON DATABASE <database_name> TO <user_name>;. This is used to create our results cache schema, if necessary. -
For schema permissions:
-
If all of the tables you intend to share with us are within the
publicschema:- You can provide
SELECTpermission on all tables withinpublicschema to all users in the public group by runningGRANT SELECT ON ALL TABLES IN SCHEMA public TO public;. - If you want Numbers Station to have access to any future tables you might add to the
publicschema, you can provideSELECTpermission to all future tables for all users by runningALTER DEFAULT PRIVILEGESIN SCHEMA public GRANT SELECT ON TABLES TO GROUP public;.
- You can provide
-
If any of the tables you intend to share with Numbers Station are not within the
publicschema, then you need to (1) grantUSAGEpermission on the target schema and (2) specifically grantSELECTpermission on that table by runningGRANT SELECT ON TABLE <schema_name>.<table_name> TO <user_name>;.
-
-
Numbers Station also requires an additional schema for our internal results cache. This can be managed in one of two ways.
- You can create a new schema and provide
ALLpermissions on this schema by runningGRANT ALL ON SCHEMA <schema_name>. - Let Numbers Station automatically create its own schema based on the name you specify in the connection.
- You can create a new schema and provide
Provide Host Address and Region
Host Address
The host refers to the hostname or IP address of the Redshift cluster that the connector will connect to.
It is the endpoint of your Redshift database that Numbers Station will use to establish a connection.
Usually a complete host address will look like this: <your-cluster-name>.<random-id>.<region>.redshift.amazonaws.com:<port>.
And the part after ":" is your network port number used to establish a connection to the Redshift database.
Region
The region is used to specify where your Redshift cluster is hosted (AWS region), and when forming the endpoint URL for the cluster, it is the <region> part of the example host address provided above.
It would typically be a string representing the AWS region code (e.g., us-west-2, us-east-1, eu-central-1, etc.).
Making a Connection in Numbers Station
Once you have the prerequisites complete, you are ready to create a connection in Numbers Station to your data warehouse.
There are two primary paths where you can create a connection.
The most direct path is to click on your account name in the top left > Settings > Connections (in the Workspace group) > Create connection. Note that this page also shows all the existing connections in your account.
The second way is to create a connection while creating a dataset. This can be done by clicking the Datasets button at the bottom left > New dataset > Create connection.
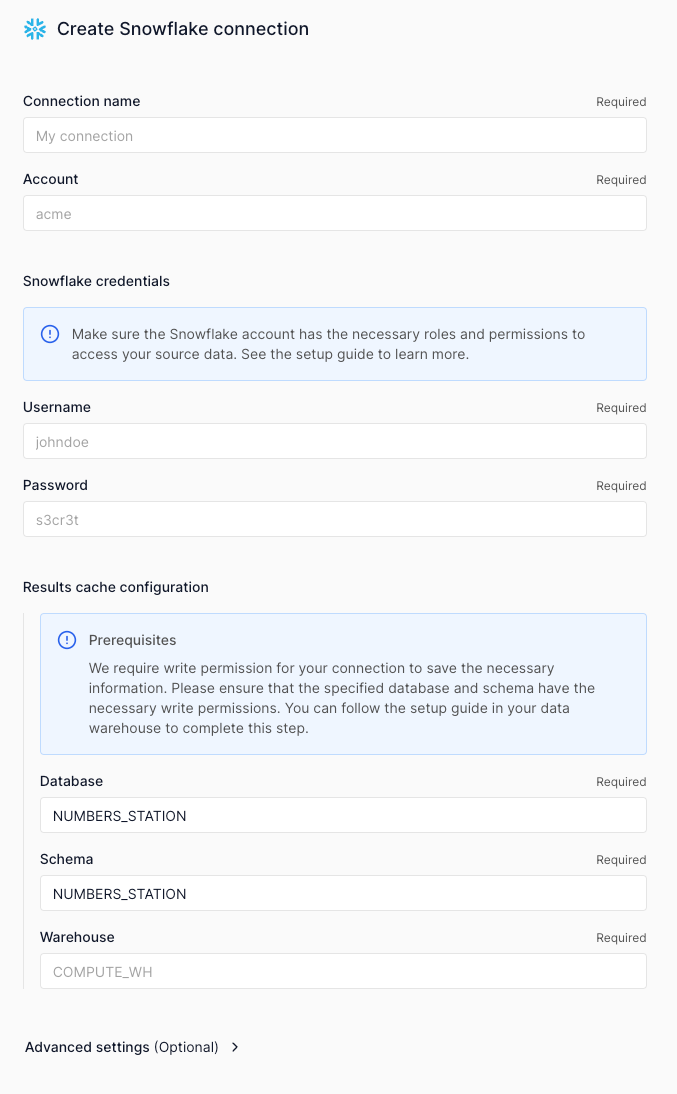
From either of these paths, you will be presented the same UI where you can input the information obtained in the prerequisite steps, so Numbers Station can connect to your warehouse securely.
Managing Connections
Clicking on the Connections icon on the left navigation menu, navigates you to a page where all the connections of the workspace are listed.
You can test, edit, and delete a connection from this page.
One of the most popular usecases is to update the password and connection secrets on periodic bases.
